Pages

Friday, May 15, 2009

Focal Point - a place for the eye to rest

A client came over to the studio last week to talk about a possible commission. I had work laid out, my portfolio ready, and she had already looked at the gallery on my website. She is a violinist so I was expecting perhaps, to do a piece based on a photograph like this one. This is my daughter, photographed by the very talented Julia Wade:


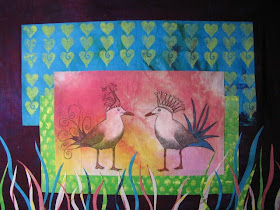
Instead, the client looked at the fabric laying out on the table that I had just screen printed, and said "can you just quilt this?" Hmmm. I really love this piece but hadn't considered it complete in and of itself. She chose a section of the fabric that she really liked and we talked about some possible stitching options.


The problem, after cutting out the section she liked, was that there really wasn't a focal point. No real place to rest the eye. She had nixed a larger black print of a violin and favored a more subtle look. I think I've got it figured out now and am excited to begin stitching into it. 

It's still subtle but now there is something to look at. Somewhere to draw your attention and hold your interest. Let me know what you think about it.

Still two Artist's Trading Cards left by the way - they go right into the next two orders of my DVD Workshop. Hope you all are enjoying it. As always - I'd love to see any work you do utilizing any of the techniques from the DVD.

Tuesday, May 12, 2009

Photo Transfer


This tutorial came out in Cloth Paper Scissor's Embellishments yesterday - thought you might like to see it too.
By Lyric Kinard
There are many wonderful photo transfer techniques out there, all fun and useful. Here is a very low-tech and inexpensive option to add to your techniques for when you just need a little instant gratification. I demonstrate this one in my new QA Workshop DVD, Click here to buy now!
Summer 2009 StudiosMaterials:

  • Citra-Solve® — an orange-based cleaning solvent (I buy it at Whole Foods.)
  • Cotton ball
  • Metal spoon
  • Non-porous smooth surface (I use glass or my countertop.)
  • Masking tape
  • Fabric of your choice
Directions:
1. Find a fun image of your favorite person or pet. Or even an Art piece.
2. Make a photocopy of the photo, sizing it no larger than 5" x 7".
3. Cut away the background and make another photocopy of the image.
4. Draw in any lines that need emphasis or add any fun scribbles you like. Maybe Grandma always wanted a tiara or your puppy looks great in polka dots!
5. Make a final photocopy. (Note: Laser and inkjet prints don’t work with this method.)
6. Tape a clean piece of fabric to your non-porous surface; stretch it tight.
7. Trim the photocopy so it has 1" of paper around it; tape it face-down on your fabric.
8. Use the cotton ball to dampen (not soak) the back of the paper with Citra-Solve; you’ll see the image show through the paper.
9. With the back of the metal spoon, rub, rub, rub like crazy in all directions. You are moving the ink from the paper to the fabric.
10. Pick up just one corner of the paper and peek to see how the transfer is working. You can put the paper back down and rub some more in any places that haven’t transferred yet.
11. Toss the paper in the trash and let the solvent evaporate.


addendum:
Citra-solv: is a household solvent/degreaser. It is a non-toxic replacement for petroleum products. I've used paint stripper and you can also use laquer thinner or acetone for the technique but both are very toxic. Take great care and work outside, preferably with a ventilator.
Photocopies: Go to Kinkos, the library, wherever you can find a machine that uses toner rather than ink. You could try a laser printer. Mine (and old lexmark) uses a carbon toner that will work. You can take a small container with Citra-solv in it with you to the center to test a copy. Some machines work and some don't. You can try transferring a copy to another piece of paper. If you are not getting any transfer right away as you rub it - it's not working.
The question most people have is where to get Citra-Solv. Here is the company site
I'm told it is available at Lee Valley in Canada.

Monday, May 11, 2009

Student Work

First a quick note: 3 ATC's left - they go to the next three people that order the Quilting Arts DVD workshop "Surface Design Sampler Platter" from me. Use the button on the upper right corner of this blog or on this page at my website.

Now on to the good stuff! 

I'd love to share some of the wonderful work done by a student in my last session of "Freeform Screen Printing" at QuiltUniversity.com. The next session opens this Friday, May the 15th. There is still space available and time to order supplies. There are four lessons, one opening each week and staying open until June 27th. I'm there on the forum to answer any of your questions and to comment on whatever work you choose to share in the student gallery. Just think - I'm at your beck and call for a month and a half - all for $36.00. Can't beat that.


Alexandra Panagopoulou took the screen printing class from the comfort of her home in Greece. Don't you just LOVE the technology that makes distance learning possible? It still boggles my mind to have students in my class from all over the world. Sure, every once in a while we all have to put our heads together and figure out where a student in a far flung place can find something like "anti-chlor" (which is used for halting the bleaching process in discharge printing.)  But it's definitely worth it and with so many good people willing to help out we always come up with a solution.


During class we learn to prepare an image for making a thermofax screen but the student can also purchase ready-made screens from different suppliers. Here Alexandra has used one of the leaf images I offer at my website and layered it in different colors on some dyed fabric. Gorgeous!


This lovely print was made with a paper stencil and masking tape resist on a wooden screen. It's an easy and low-tech method that has yielded beautiful results in her capable hands. I look forward to seeing more of Alexandra's work in the future. Perhaps, someday - even in person!


Monday, May 4, 2009

ATC's, Spring, Books, Workshops

There are 9 ATC's left to go out with the Surface Design Sampler Platter DVD orders! I'll let you know when they're gone. I've heard back from a couple of you that have watched it - I'm so glad you're enjoying it! I'd love to put up any artwork you make using the techniques taught in the DVD in the student gallery on my website.


I love spring. What is it about sunshine and a little bit of warmth that gets me all pumped up to work in the studio? I should be itching to be outside. I do face the windows most of the time I'm working and it's a lovely view. North Carolina is such a green place.


I did go outside to my little garden nook last week to finish up the first layout edit of my book. It's done and off to the designer again. I'll see it for one final check before it goes to print. I think I'm going to call the book my 6th child. It's taken longer and been almost as painful at times to create it. I'm thinking the rewards will be much more immediate - no crying at 2 a.m. or teenagers who talk back. 


Enough rambling. I wanted to point you to a really great blog post titled, "How to make the most of an art quilt workshop" by Elizabeth Barton over at "Art & Quilts, Cogitations Thereon." My favorite part of her post talks about pre-planning and runs through a great list of questions to ask yourself before signing up for a workshop. It's a great idea to know ahead of time if you are looking for a technique or a project class. Do you want to just understand and absorb the thinking of an artist you really admire? Are you happy to just hang out with friends? Do go and read her post - it's chock full of great information.

Most of the classes I teach are technique classes with a bit of a project thrown in. Projects seem to appeal to the more traditional quilters who have a little niggling desire to be an artist hidden away in the corner of their heart. That's my personal crusade these days - helping those desires to come out of hiding. 


In that vein - here is a link to Fabrications - a week long retreat from Aug 30 - Sep 4. I'll be teaching "The Elements of Art" for the entire week and I couldn't be more excited. It will be a chance to delve deeply into the visual language, to learn the principles of good design.  We'll start from the very beginning (a very fine place to start...) and work until we have a good understanding of the basics (do, re, me...). By the end of the week you'll have a good start on a composition and have lots of supportive feedback so that you can keep the creative juice flowing when you get back home.

I'd love to see you there - and happy spring!