Thursday, May 31, 2012

Work in Progress: Call and Response


It's been quiet here for a good reason. I've had deadlines one after the other. Again - it seems to be the only way I actually get any work done but the pressure can be a killer.
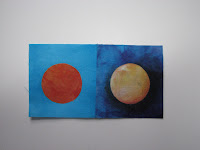
One of the pieces I've been working on, and I consider it still to be a work in progress:
Call and Response
By Lyric Kinard and poet Maura High
There are still finishing touches to work on - and I'm still working on that background. I think it needs a little more integration - Maura pointed out that there was an awful lot of white space. She is right. I have a couple of weeks before it will hang. More on that later.

Wednesday, May 30, 2012

On-Line Class: Playing With Paint

A new session of "Playing With Paint" will begin Friday, June 8th at www.QuiltUniversity.com. It's a great on-line class where we learn to play with complete abandon. It's just like being  back in kindergarten - oh - and we'll also be learning the properties and uses of textile paints.


will include many wet brush painting techniques, stamp carving, stenciling, and yes - 
playing with your food.

One lesson opens each week for four weeks but I'm on-line for at least five or six - answering any questions and commenting on all the fun work students submit to the class gallery.


During this tough economic time on-line courses are a fantastic alternative to the expenses of traveling to a live workshop. $36.00 for a month of fun is a great value. Oh, and you get to come to class in your pajamas!


SIGN UP NOW! Let's PLAY!
You can see a class description and supply list here: http://quiltuniversity.com/classlist.htm#PlayingWithPaint

Tuesday, May 29, 2012

Student Spotlight: schooling with the Pamlico River Quilters

5 Ways to Applique 
with the Pamlico River Quilter's Guild
in Washington, NC


fun was had by all....

I even had time to take a little walk along the estuary river before driving home... beautiful!

Saturday, May 26, 2012

On-Line Class: The Artist's Toolkit

Registration is open for
The Artist's Toolbox

An on-line course at www. QuiltUniversity.com
based on the book
Art + Quilt: Design Principles and Creativity Exercises

Come learn the basic alphabet of the visual language, the elements and principles of good design.

I'll walk you through each element, explaining them in easy to understand language and metaphors.

We'll observe each element in the world around us both in art and in the natural world.

Finally we'll put what we've learned into practice through practical exercises.


The supply list couldn't be simpler.
Sketchbook and whatever drawing stuff you have
Glue Stick
Fabric Scraps

Registration is open now and the class fills almost every session so don't delay.
Class begins June 1st
(4 lessons, the forum is open for 6 weeks)

Monday, May 21, 2012

Friday, May 18, 2012

Student Spotlight: Apli-Punto with the Capital Quilt Guild

Spent a lovely day with friends at the Capital Quilter's Guild.
Apli-Punto to Go is a technique that looks crazy complicated.

 But it's easy enough that this is what we got done in one class.


With GREAT BIG smiles on our faces!

Wednesday, May 16, 2012

For Your Inspiration: Snoqalmie Falls

 Near Seattle, WA
The roar - the volume of water - the spray - it was powerfully and overwhelmingly beautiful!

These panoramic images were created with Autostitch on my iPhone.
(I truly believe that the iPhone is the funnest toy and greatest tool ever invented!)

Rattlesnake Lake

On a side note: my mother and I both have brains that don't have any long term recall. If I want to remember something from childhood (even most of my teenage-hood) I call my sister and ask her about it. I don't have many visual memories - which might seem odd for a visual artist. The sense of SMELL, however, can bring back amazingly powerful emotions, if not images. This lake smelled like pure joy!  My family spent summers camping in the high Uinta mountains and we had a very happy family. Still do.

Monday, May 14, 2012

Creative Wisdom: Begin Again


"Every artist was first an amateur."  ~Ralph Waldo Emerson

Spring is a time for new beginnings.


I am always enthralled with the opening of a blossom - watching a tight little bud swell and burst into a fully opened flower, full of life and color and light. I get just as big a thrill from seeing students find their creative confidence. Often they come in with just the hint of a wish - a deep and secret desire to be an artist and to create something beautiful. They are afraid to let the bud swell on the branch for fear of ridicule or failure.

A blossom needs warmth and light, time and nourishment in order to swell and open into it's full glory. I try to give my students those same things: a safe environment in which to explore, information that will enlighten them, and permission to expand into whichever form most suits their creative spirit.

"Though no one can go back and make a brand new start, anyone can start from now and make a brand new ending." ~Anonymous
Give yourself time and permission to become what you were meant to be.

Are you holding your opportunities for growth tightly within or are you giving yourself room to grow and permission to learn? Blossoming can be a messy business with pollen and bugs and dropped flowers but that is how the plant prepares itself to expand for the next year. Give yourself time to experiment - let your wildest artistic ideas out into the light and see what happens. 


Come PLAY and GROW with Lyric this summer!
Four Fabulous days at ProChemical and Dye August 16-19th, 2012
Fall River MA
playing with paint at the VCQ

Are you are intrigued by the art of surface design but can’t choose which technique you most want to learn? Surface Design Sampler Platter is the perfect place to try a taste each! Play with paint, foil, photos and embellishments to create your own gorgeous fabrics. You will delve deeply into printing with screens, stencils, and with stamps you have carved yourself. Come be delighted by different applications of foil and  you will learn several methods of photo-transfer. Time will also be spent learning how to embellish your work with beads and as an added bonus, Lyric will teach the basic elements and principles of good design. With  good humored and gentle guidance you will work on your own textile art composition using the beautiful fabrics you have created

You can get more info and sign up here!

Wednesday, May 9, 2012

For Your Inspiration: Seattle, WA

I spent an absolutely lovely few days with the Block Party Quilters in Seattle last week.


Sunday, May 6, 2012

The Kindness Chronicles

"Those who bring sunshine into the lives of others, cannot keep it from themselves."
James M. Barrie


If you haven't discovered the TED talks yet - you are in for a treat. Here's one that I enjoyed this month.
A researcher named Michael Norton found that money can by happiness - but only if you don't spend it on yourself.

The 101 Happy People Project
A young man is gifted anonymously with $100 and chooses to spend it on 100 gifts for others.

The 101th person is himself - it makes him happy to find little ways to help others.

My friend Lindy Rex battled cancer for 11 years before passing away last week.
She made jewelry and gave it away to patients whenever she went in for treatments. She'd have sales and donate the money for cancer care and research. She loved to teach anyone who stopped by how to create their own beautiful jewelry. She helped me finish a two foot high stack of samples for my book when I was going crazy under a tight deadline. She made a quilt for a retiring school teacher. She always thought of others - and acted on those thoughts.
She brought light and love into this world and I'm sure she is still doing so in the next world.  We will miss her terribly here. I want to carry on her good works. I want to be as unselfish and giving as she was.


Saturday, May 5, 2012

Tutorial: How to edit a photo for a thermofax screen

I'd like to show you how to take a photograph and prepare it for a thermofax screen. Printing with these screens is one of my very favorite things to do - you can use them with cloth or paper or really - any flat surface. If you don't have access to a thermofax machine, I have a service where I can create a screen for you from your own images, as well as having a number of ready-made images for you to use.


1- Select an image. Choose something with high contrast - it's easiest if it has a plain or simple background. Either use your own photography or find something that is copyright free. Wikimedia Commons has a wonderful repository of images under Creative Commons Licenses that are available for you to use. Download the highest resolution available.
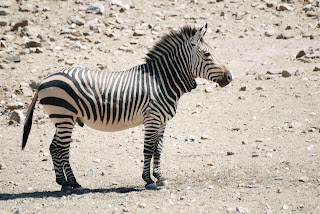
Harmann zebra, Hobatere Private Reserve, west of Etosha National Park
Author - moongatclimber
2 - Open your image in your favorite digital editing program. 
I'm using Adobe's Photoshop Elements (PS10) but the tools I'm using are fairly standard. They might be in a different place - if you have trouble finding them type in the name of the tool in the help window on the toolbar. You can download a trial version of the PS10 and use if free of charge for 30 days.

3- Crop your image.
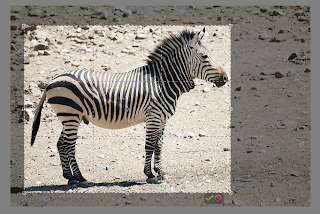
Use the CROP tool to eliminate extra background. It simply gives you less space to have to fuss with.


4- Remember that command or control Z is your best friend - it's the "undo" function and will let you back up as many steps as you need to if you don't like what you've done.


\5- Select your subject. Use the magic wand, or some other selection tool to click and select all the way around the edge of your subject. You might need to click a lot in some areas that don't have a high contrast line - don't worry if extra space is included - you can erase that in a minute.


Sometimes when I double click I lose the selection. I just clicked too fast and the whole thing disappeared. What I do is just hit command Z again and it reappears.

6- Invert the selection.  The blinky line will now be around the outside of the image and around your subject.


7- Hit Delete and the background will disappear - at least mostly.

8- Control - D deselects everything.

9- Click on the Zoom tool and zoom in so you can see the edges of your work.


You can see that there are areas that need a bit of cleaning up and areas that you might not want to draw attention to. (Sorry guy - you’re going to be gelded.)


10- Choose the eraser tool to clean up your edges. 
Use the slider to change the size of the pixel brush so that it comfortably fits within your picture. Keep the opacity at 100%.
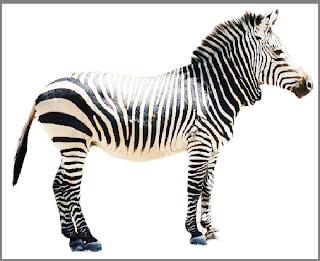


Start working your edges but try not to erase large areas all in one sweep. That way if you accidentally erase something you wanted to keep (remember “control Z!”) you won’t have to re-do large areas.
Continue to zoom in and out, moving around your image and changing the size of your brush to get into any tight areas.


11- Play with the Threshold filter found under the Filter/Adjustments menu. Sometimes it works the first time but sometimes you need to back out and fix some other things first. This is one of those times.
In this case, Mr. Stripes has lost the stripes on his back - he’s not quite ready for the “Threshold” filter yet. Simply hit “cancel” and we’ll do something else.


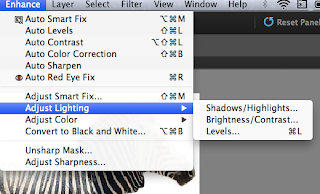
12- Play with the lighting. Find "Enhance/Lighting" then either "Brightness/Contrast" or  "Shadows/Highlights". In this case - it is the highlights on the Zebra’s back that are being lost so I’m going to play with those for a bit and see if I can get the black and white stripes to look more even.

I’ve darkened the highlights, played with the shadows and messed with the midtone contrast until it looks like all of the stripes are closer to the same. Notice all the highly technical terms I’ve used - it’s really just messing around with things until you get something you think will work. As you gain experience you’ll be able to come quicker to the place where you can make the image work for a thermofax screen.


13- Try the Theshold function again.  My goal was to keep his eye from disappearing but to still keep the stripes on his back. Just move the slider back and forth until you are happy with your image.
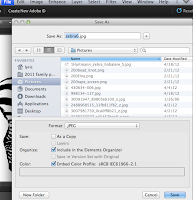
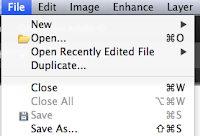


14- Save your image. In fact - it is helpful to take this step quite often during your explorations. Hit File/Save As - (NOT just the automatic save function!) and rename each picture as you go. For instance, Zebra1.jpg, Zebra1.jpg etc.
Another thing to pay attention to when that "save as" screen is up is the "options" button. (I think I might have cut it off in this picture. It's usually on the bottom right. Slide your "Image Quality" button all the way to maximum. This minimizes the compression that happens every time you save a jpg. If you don't do this the file size might be so small by the time I get it that it will be too pixelated to use.

And there you have it. A crisp black and white image - no shades of gray - ready to be turned into a thermofax screen for your printing pleasure.


Send it through your thermofax machine or send it off to your favorite thermofax service provider and get ready to play! You'll be printing in no time at all!