Showing posts with label tutorial. Show all posts

Thursday, August 23, 2012

Tutorial: Wrapping a Gallery Wrapped Canvas

As promised - here is part 2 of my process in creating a series of works for 
Art Box work by Lyric Montgomery Kinard

(part 1 on the process for these works can be found here)
Position your unstitched top on your canvas and trim it down - leaving enough cloth to wrap to the back of your gallery wrapped canvas. In this instance I'm using and 8"x8" canvas, 1.5" deep.

Adhere fusible web (regular weight Wonder-Under is my favorite for this technique) to the back side of your finished top.

Trim the cloth and remove the release paper.

I've placed batting on the canvas with just enough to cover the edges and cut out the corners.

Carefully position the cloth on the canvas 

I use the release paper on each side to protect both the iron and the board as I make sure the fusible web is well adhered to the cloth and the batting. 

Quilt or stitch and embellish your cloth with the batting but no backing. (yes - it's a different top in the series from here on out - the pictures were better on this one.)

Here is the stitching from the back - yup - no backing cloth - just the batting.

Pull each of the four corners up and fuse them over the back to the wood. I trimmed the corners where they overlapped into the middle as per the next picture.

Cut the cloth along each side, almost to each corner. Leave just a bit connected.

Tuck in the cloth on the corner, carefully creating a little pleat, pulling the edge of the fold cleanly to the corner edge of the frame.

Iron the side of the canvas, making sure the iron  only touches the side, not the back of the canvas. You need to hold the pleat in place - but be very careful not to burn your fingers.

Cut and trim out any excess cloth, making sure to leave enough cloth with exposed fusible to be able to tack it down. Sometimes I'll pull a little of the batting away and trim it as well.

Pull each flap in to the wood and iron it down, making sure the corners are cleanly folded. There should be enough exposed fusible web to seal the fabric to itself on the corners and the wood around the edges.

Press all the flaps of fabric to the wood. Sometimes I leave the cloth long enough to press into the inside of the wood frame to give it a really clean look.

 One last press of each edge.

Lovely clean corners.

The finished artworks in this series are available for purchase for a VERY reasonable price at

The Art Box CSA

Friday, August 10, 2012

New Work: The Art Box - process part 1

I thought you might enjoy seeing the creation process for the series of works I did for
Art Box work by Lyric Montgomery Kinard


dye and discharge cloth with a katazome inspired thermofax screen

mix colorless extender with textile paint to increase its transparency

use photoshop and make several images for a thermofax screen - variations on a theme

put it up and take a look - say oooooh, aaaaah!

test images for placement, keeping in mind the size of the canvas

use a strong enough color that it will contrast and become a focal point

a second screen will be used to apply foil adhesive to a selected area

a card (I always end up with a hotel room key) is perfect for this size of screen

lay the foil color side up on top of the DRY adhesive and use the edge of the iron and quite a bit of pressure to apply the foil

let the foil cool before peeling it off

check placement with canvas again before proceeding to the next step - adding batting and stitching

Keep your eye out here for a tutorial on how to mount the finished work on a gallery wrapped canvas.

The finished artwork in this series is available for purchase at


What is an Art Box?
An Art Box is a new and exciting way to purchase a collection of art from several different artists at once.  Artists create a limited number of new original artworks for inclusion in the box in a predetermined size making it easy for the collector to display them together if they desire. Purchasing an Art Box is a cost effective way to begin or add to a growing art collection from today’s most popular mixed media and textile artists. 

Saturday, May 5, 2012

Tutorial: How to edit a photo for a thermofax screen

I'd like to show you how to take a photograph and prepare it for a thermofax screen. Printing with these screens is one of my very favorite things to do - you can use them with cloth or paper or really - any flat surface. If you don't have access to a thermofax machine, I have a service where I can create a screen for you from your own images, as well as having a number of ready-made images for you to use.


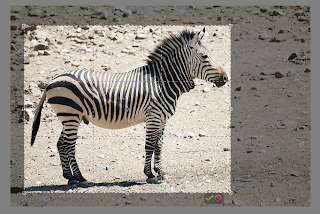
1- Select an image. Choose something with high contrast - it's easiest if it has a plain or simple background. Either use your own photography or find something that is copyright free. Wikimedia Commons has a wonderful repository of images under Creative Commons Licenses that are available for you to use. Download the highest resolution available.
Harmann zebra, Hobatere Private Reserve, west of Etosha National Park
Author - moongatclimber
2 - Open your image in your favorite digital editing program. 
I'm using Adobe's Photoshop Elements (PS10) but the tools I'm using are fairly standard. They might be in a different place - if you have trouble finding them type in the name of the tool in the help window on the toolbar. You can download a trial version of the PS10 and use if free of charge for 30 days.

3- Crop your image.
Use the CROP tool to eliminate extra background. It simply gives you less space to have to fuss with.


4- Remember that command or control Z is your best friend - it's the "undo" function and will let you back up as many steps as you need to if you don't like what you've done.


\5- Select your subject. Use the magic wand, or some other selection tool to click and select all the way around the edge of your subject. You might need to click a lot in some areas that don't have a high contrast line - don't worry if extra space is included - you can erase that in a minute.


Sometimes when I double click I lose the selection. I just clicked too fast and the whole thing disappeared. What I do is just hit command Z again and it reappears.

6- Invert the selection.  The blinky line will now be around the outside of the image and around your subject.


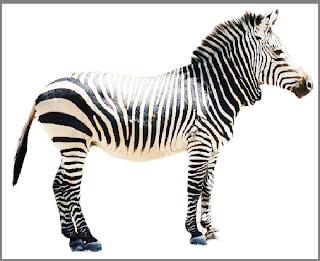
7- Hit Delete and the background will disappear - at least mostly.

8- Control - D deselects everything.

9- Click on the Zoom tool and zoom in so you can see the edges of your work.


You can see that there are areas that need a bit of cleaning up and areas that you might not want to draw attention to. (Sorry guy - you’re going to be gelded.)


10- Choose the eraser tool to clean up your edges. 
Use the slider to change the size of the pixel brush so that it comfortably fits within your picture. Keep the opacity at 100%.


Start working your edges but try not to erase large areas all in one sweep. That way if you accidentally erase something you wanted to keep (remember “control Z!”) you won’t have to re-do large areas.
Continue to zoom in and out, moving around your image and changing the size of your brush to get into any tight areas.


11- Play with the Threshold filter found under the Filter/Adjustments menu. Sometimes it works the first time but sometimes you need to back out and fix some other things first. This is one of those times.
In this case, Mr. Stripes has lost the stripes on his back - he’s not quite ready for the “Threshold” filter yet. Simply hit “cancel” and we’ll do something else.


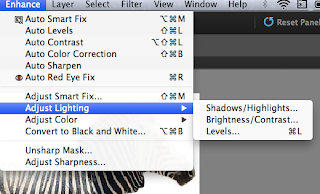
12- Play with the lighting. Find "Enhance/Lighting" then either "Brightness/Contrast" or  "Shadows/Highlights". In this case - it is the highlights on the Zebra’s back that are being lost so I’m going to play with those for a bit and see if I can get the black and white stripes to look more even.

I’ve darkened the highlights, played with the shadows and messed with the midtone contrast until it looks like all of the stripes are closer to the same. Notice all the highly technical terms I’ve used - it’s really just messing around with things until you get something you think will work. As you gain experience you’ll be able to come quicker to the place where you can make the image work for a thermofax screen.


13- Try the Theshold function again.  My goal was to keep his eye from disappearing but to still keep the stripes on his back. Just move the slider back and forth until you are happy with your image.


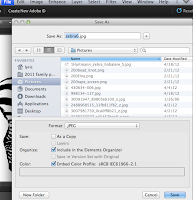
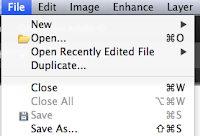
14- Save your image. In fact - it is helpful to take this step quite often during your explorations. Hit File/Save As - (NOT just the automatic save function!) and rename each picture as you go. For instance, Zebra1.jpg, Zebra1.jpg etc.
Another thing to pay attention to when that "save as" screen is up is the "options" button. (I think I might have cut it off in this picture. It's usually on the bottom right. Slide your "Image Quality" button all the way to maximum. This minimizes the compression that happens every time you save a jpg. If you don't do this the file size might be so small by the time I get it that it will be too pixelated to use.

And there you have it. A crisp black and white image - no shades of gray - ready to be turned into a thermofax screen for your printing pleasure.


Send it through your thermofax machine or send it off to your favorite thermofax service provider and get ready to play! You'll be printing in no time at all!