Showing posts with label Quilting Arts Magazine. Show all posts

Monday, September 17, 2012

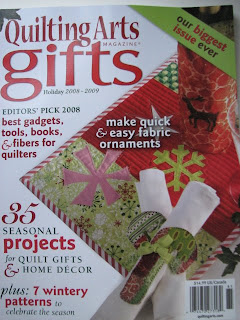
Quilting Arts Gifts!


Have you seen it yet?
This year's issue of
 Quilting Arts Gifts
is on the news stands now. Wait - is there still such a thing as a news stand?
Nevermind - you can get your copy here.
I have a lovely little project included - showing you how to make a silk art scarf with a beaded fringe. Let me know if you like it. And - there is also an advertisement for my DVD, Bead It Like You Mean It with as special price for QA readers.

You might also like some of the tutorials here on this blog - check them out under the link up there under the header. It says "tutorials." 

Thursday, May 5, 2011

Quilting Arts Challenge


Are your inspired by the projects in Quilting Arts magazine? If you like trying out new ideas and techniques, Muppin from the Quilting Arts Forum has a new challenge for you. The artwork can be any size and any technique that you have seen in the magazine over the last 10 years, but your work should be something new made for this challenge. Upload your photo to the forum page by May 31st and show your stuff! Random participants will also get prizes.

I'll be popping up over there once in a while to spout off encouraging words. And I just know..... of course you are going to choose to be inspired by one of MY articles. wink. wink.

Thursday, March 3, 2011

In Stitches eMag blog tour

Gotta say - I LOVE technology! New things come along all the time that just make me giggle.
eMagazines along with tablets like the iPad are the wave of the future I think - although I'll always love a good paper book and magazine. But clickable links and video? Awesome!!!!!

Quilting Arts and Interweave have just come out with their second edition of
Read more about it the next few weeks from the authors!
There are a few giveaways along the way, including one here, so don't miss one!

Sunday (Feb 27): Pokey launches the tour!: http://www.quiltingdaily.com
Monday (Feb 28): Jane Davila: http://janedavila.blogspot.com
Tuesday: Lynn Krawczyk( March 1): http://www.fibraartysta.blogspot.com
Wednesday: Jackie Cardy(March 2): http://dogdaisychains.blogspot.com
Thursday: Deb Bates (March 3): http://stitchtress.wordpress.com
Friday: Deborah Boschert (March 4): http://deborahsjournal.blogspot.com
Saturday: Michelle Allen (March 5): http://allendesigns.typepad.com
Monday: Lyric Kinard (March 7): http://lyrickinard.blogspot.com  
Tuesday (March 8): A surprise guest on Lindsey’s blog will be the final stop of this tour http://www.quiltingdaily.com

Wednesday, March 2, 2011

Art to Go


People look at my hand work and tell me they don't have the patience to do it themselves. I do handwork precisely because I do NOT have the fine quality of patience. I need to be doing something with my hands in order so sit through a practice or TV show.... although it's hard for me to remember the last time I had time to sit through an hour of TV. So much work to be done.


In the current issue of Quilting Arts Magazine I've written an article titled Art to Go that helps you gather together what you need to be mobile with your textile art. Excerpts are published on Interweave's Sew Daily blog here:

http://www.sewdaily.com/blogs/sewdaily/archive/2011/03/01/sew-and-go.aspx

Thursday, January 27, 2011

New Article in Quilting Arts Magazine


I love it when the mailbox opens up to goodies like this one! The newest issue of Quilting Arts magazine is as lovely as ever. It includes an article by little 'ol me.


Enjoy!

Thursday, October 14, 2010

Tutorial: Beaded Fringe

When I sent in the little cases I had made to Quilting Arts Magazine for the "Glam-To-Go for Gadgets" article, they didn't use the case I actually spent the most time making. I think perhaps that it was either too froofy, made the article too long, or was for the outdated ipod classic rather than the new iphones. No worries. I'll show it here to you. You can get the article for free in the current eBook at QuiltingArts.com for instructions on making the cases. I'd love to show you here how to make the funky beaded fringe.
Materials: 
  • Something to add fringe to: gadget case, scarf, your husbands favorite necktie. In any case it will need to have enough "oomph" to support the fringe. In this instance, the fringe will be supported by the satin stitched bottom edge of the case. For a scarf I like to add a tiny bit of cording or seam tape or ribbon (depending on the weight of the scarf) inside of a rolled hem.
  • Beading thread (I love Nymo) and a beading needle (or a size 11 applique needle.)
  • Seed beads and other larger beads. Make sure the holes in the larger beads are not so big that the seed beads sink into them. If they are you'll need to put medium beads next to the large holed beads.


1 - Make your knot. Thread your needle, bring it in through the case and out on the edge of the satin stitching. Leave the tail of the thread hanging out. Wrap the thread (not the tail end) three times around the tip of the needle, hold the wrap with your thumb and pull the needle through. You should have a secure knot now. I often make at least one more knot in close to the same place just to be extra secure.


2 - Load your beads onto the needle. Add seed beads until your fringe is about as long as you wish it to be then add your bigger bead and one more seed bead. The seed bead on the end is your anchor. Slide all of the beads to the end of the thread.


3 - Anchor your fringe. This is the only tricky part - and it really isn't hard. Slide that last seed bead away from the line of beads then send your needle right back through your whole line of beads. I find it easiest to do if I bend the line of beads over my finger, holding the thread taut. This lines up the beads in a row and holds the thread tight along the bottom of each hole. That way you have room to get the needle back up through the whole line.


4 - You might not be able to get the needle all the way through your line of beads in one shot. No worries. Just do it a bit at a time, holding that thread taught to it easier to slide the needle through.


5 - Push your needle into the satin stitching, right under your fringe and come out where you want the next fringe to start. Continue adding fringe until you think you're done. Notice here that my fringe isn't the same - I like it funky. Sometimes my big bead is in the middle, sometimes there are more seed beads on the end than just one anchor. Mix it up and make it fun.


6 - Make a knot right next to the last fringe in the same way you did at the beginning. In fact, make two knots. Come to think of it, make a knot and just keep going (not starting with a new thread each time) every three or four fringes just to be safe. I truly dislike the sound of a million tiny beads scattering across the floor as my child yanks on my fringes. At the end, after your last knot, send your needle up through the satin stitching and come out anywhere. Trim the tail off and you're done.

There you have it. Next week I'll post a short tutorial on how to make the ribbon strap shown on the butterfly case so be sure to stop by again!

Monday, October 11, 2010

Free Quilting Arts eBook

Over at QuiltingArts.com - an art quilter's social networking resource, they put out a free e-book every few months or so. This month's book features an article of mine titled: "Glam to Go for Gadgets" along with a number of other great articles on the subject of textile art.


It's free, easy to download, and as with all of QA's stuff - looks great. I love their graphic design team - talented folks over there. So pop on over and pick it up at QuiltingArts.com under "free stuff." I do believe you need to register on the site to have access.
Enjoy!

Saturday, May 1, 2010

Quilting Arts FREE e-book

Over at QuiltingArts.com - an art quilter's social networking resource, they put out a free e-book every few months or so. This month's book features an article of mine titled: Picture It Framed along with a number of other great articles on the subject of finishing your textile art.

It's free, easy to download, and as with all of QA's stuff - looks great. I love their graphic design team - talented folks over there. So pop on over and pick it up at http://quiltingarts.com/media/p/17544.aspx. I do believe you need to register on the site to have access.


I also have more picture tutorials on mounting and framing methods over on my website: 

Monday, September 28, 2009

Open Studio Tour

Want to see something cool and scary? Quilting Arts magazine's STUDIOS issue is hosting an Open Studio blog event.


That's not the scary part. This is the scary part. October is the month where I teach a lot (schedule here) so I'm putting together kits and supplies. I bring a lot of stuff for my students. That includes books and DVD's and lots of fun surface design goodies too. Last spring my studio was gorgeous in preparation for it's spread in Studios Magazine.

Um - not right now. Want to see some real life Studio work in progress? Watch this at your own risk!


It's always a ton of fun to see where someone else works isn't it? You can see a whole bunch more studios starting October 3rd at http:/www.quiltingarts.com.

Monday, July 27, 2009

From the Back

I'm putting together the last bits of an article for "International Quilt Festival: Quilt Scene" and of course I can't show you the cool samples - but I will give you sneak peek and show you some of the quilting from the back.

Because sometimes the back looks really cool even when you use your least favorite piece of fabric from the last dye batch. Can't tell you how many magenta/turquoise pieces I have - time to start over-dyeing them. AFTER I finish writing.

Thursday, July 23, 2009

The Dye Bath

Last week was pretty hot - pretty busy - very colorful! I had half a bolt of fabric (50yds) and tons of vintage lace (thanks to Ebay) ready to go. The lace will go into kits for "Photos on Fabric" that I'll be teaching in Houston at the International Quilt Festival in October.


In one way I really love the dye process - but it's a lot of work. Not a whole lot more to mix up dye concentrates and dye a huge amount of yardage than to dye just a few yards so why not do the whole thing at once? Kind of like making spaghetti sauce. I only make it in my gargantuan humongo pot. I usually freeze enough for five or six large meals. This will be most of my palette for the next year or so - or at least until I need some different colors.


The instigation of this particular dye batch is an article for "International Quilt Festival: Quilt Scene"  - a new magazine being put together by the indefatigable editor of Quilting Arts and Cloth Paper Scissors. Fun stuff.

Tuesday, May 12, 2009

Photo Transfer


This tutorial came out in Cloth Paper Scissor's Embellishments yesterday - thought you might like to see it too.
By Lyric Kinard
There are many wonderful photo transfer techniques out there, all fun and useful. Here is a very low-tech and inexpensive option to add to your techniques for when you just need a little instant gratification. I demonstrate this one in my new QA Workshop DVD, Click here to buy now!
Summer 2009 StudiosMaterials:

  • Citra-Solve® — an orange-based cleaning solvent (I buy it at Whole Foods.)
  • Cotton ball
  • Metal spoon
  • Non-porous smooth surface (I use glass or my countertop.)
  • Masking tape
  • Fabric of your choice
Directions:
1. Find a fun image of your favorite person or pet. Or even an Art piece.
2. Make a photocopy of the photo, sizing it no larger than 5" x 7".
3. Cut away the background and make another photocopy of the image.
4. Draw in any lines that need emphasis or add any fun scribbles you like. Maybe Grandma always wanted a tiara or your puppy looks great in polka dots!
5. Make a final photocopy. (Note: Laser and inkjet prints don’t work with this method.)
6. Tape a clean piece of fabric to your non-porous surface; stretch it tight.
7. Trim the photocopy so it has 1" of paper around it; tape it face-down on your fabric.
8. Use the cotton ball to dampen (not soak) the back of the paper with Citra-Solve; you’ll see the image show through the paper.
9. With the back of the metal spoon, rub, rub, rub like crazy in all directions. You are moving the ink from the paper to the fabric.
10. Pick up just one corner of the paper and peek to see how the transfer is working. You can put the paper back down and rub some more in any places that haven’t transferred yet.
11. Toss the paper in the trash and let the solvent evaporate.


addendum:
Citra-solv: is a household solvent/degreaser. It is a non-toxic replacement for petroleum products. I've used paint stripper and you can also use laquer thinner or acetone for the technique but both are very toxic. Take great care and work outside, preferably with a ventilator.
Photocopies: Go to Kinkos, the library, wherever you can find a machine that uses toner rather than ink. You could try a laser printer. Mine (and old lexmark) uses a carbon toner that will work. You can take a small container with Citra-solv in it with you to the center to test a copy. Some machines work and some don't. You can try transferring a copy to another piece of paper. If you are not getting any transfer right away as you rub it - it's not working.
The question most people have is where to get Citra-Solv. Here is the company site
I'm told it is available at Lee Valley in Canada.

Thursday, March 12, 2009

The Big Goal


I only made one big goal for 2009
!!! MAKE ART !!! 

It seems the past year and a half was spent rushing around meeting one deadline after another. All good things for my career. All things that will support the artmaking but no actual making of the artwork itself.

This week has been bliss. My first week in months and months with no deadline to meet. I actually wake up and get to choose what to do. At least in the two hours a day that I have to myself. Usually I work frantically trying to get something I have to get finished done while everything else falls apart around me. (Especially the house.)


I weeded a favorite garden, unburying a stone path that has been hidden the past year. And then I pulled out a piece that was started several YEARS ago. It's the perfect thing to help me get acquainted with my new HQ16. The poor neglected machine has waited patiently since last fall for me to pay attention. It's going to take a little learning but we're getting there. So here's a sneak peak. The machine quilting is done but I think the work itself is only beginning on this piece.

Here's a sneak peak at the work in progress.


Friday, March 6, 2009

Fun on the Set

It's finally done and over with. A month's work for a few hours of taping but it was a great few hours and a very fun few days with lots of wonderful artists. I taped a 10 minute segment for season four of Quilting Arts TV as well as a DVD Workshop titled, "Surface Design Sampler Platter." The workshop is a little taste of quite a number of surface design techniques, including carving a stamp, printing with found objects, stencil cutting, screen printing, foiling and photo transfer. Whew. Talk about cramming a lot of stuff into a short time - as well as into a small suitcase!


I met Melanie Testa who is a very fine artist and a sweet young lady to boot! It was great fun getting to know her and I look forward to seeing her again in Houston at the International Quilt Festival. It was also wonderful to watch her tape. It calmed my nerves just to watch the process and figure out that hey, I was going to be just fine. I could ask to stop if I needed to and there would be ample time to reset between each segment of the DVD. Here we're getting a little silly - Melanie with relief that she's done and me with nerves.


Everyone with the production is so nice. They work hard to make you look good, feel good, and come off like you know what you are talking about. Bernina's representative, Jeanne always had a great big smile! Helen is quiet, but always there when you need her. Pokey is a hoot to watch run around - change outfits ten times - make funny faces at the camera - and check her e-mail twenty times between each shoot. That girl has some serious energy.

Here's Helen and I - with just some of the loads of SCHTUFF on the table - getting organized. Jeanne and Karen are in back - probably planning some serious shoe shopping.

Just have to mention the amazing artist who made my drop-dead-gorgeous scarf! You can see Jill's work at her Etsy shop.

Monday, September 8, 2008

Quilting Arts Gifts

Fun stuff again! I just received advance copies of Quilting Arts GIFTS, a fun issue full of quick and easy projects that are perfect for Christmas. It should be on the stands by the end on September.


It's been years since I've had time to make hand-made gifts for people so I don't usually pay attention to projects like this. If I were to do something from this issue however, it would most definitely by Lois Jarvis' Travel Scarf. You'll have to look it up. Here's a sneak peak at my project.


As sort of an "aside" I thought I'd share my Christmas gift philosophy. We have lots of kids in our family. We live in an affluent area of the United States. We love Christmas. I do, however, try my level best to raise my children without that sense of entitlement that seems so prevalent among children today. I think they get tired of my telling them that we are put on the earth to make it a better place, not to be entertained.

The kids get one gift from "Santa" and a small something in their stockings. They love to make or buy gifts for each other. We don't put presents under our tree until Christmas Eve. After they go to bed each child is allowed to sneak up, pull out the gifts for the family that they have hidden, and put on the elf hat and arrange it under the tree. Then we put the rest of the gifts there. 

We give family portraits to our parents every year and among my siblings we have traded names in the past. Lately we have written down our different memories of a common experience instead of buying things. Eventually we will have a family history book that will be a treasure for generations.

We try each year to choose a service project, such as sponsoring another family, and go all out spending a day shopping and wrapping and when possible, anonymously delivering gifts for them. The kids know Christmas is not their birthday - it is Christs'. 

Saturday, February 9, 2008

What A Week!

I can't believe everything that has happened this week. It's been absolutely insane. The regular old mom job has been pretty much normal, running here and there for this sport and that music lesson and the other playgroup. The weather turned warm enough that I (gasp) shaved my legs and wore capris. I've seen one daffodil blooming at the top of the hill and mine are beginning to wake up.


I did get a rejection letter from the Raleigh Fine Arts Society show. Not a big surprise. Didn't even blink an eye because I was too busy (take a huge breath here) writing for my second on-line course offering, finishing edits for my first, finalizing the contract for a book, and putting together a new class based on my current article for Quilting Arts Magazine because the director of education at the International Quilt Festival in Houston asked me to teach it there this fall.

Knees are knocking here. Oh my goodness. The windows of heaven are opened and the blessings are pouring out and I'm wondering if I'm about to drown.

Tuesday, February 5, 2008

That Happy Glow!

OK. I love being a mom. Really I do. But let's face it. The immediate rewards can be hard to appreciate. No paycheck. The only way you get time off is to pay for it yourself - arranging childcare which you then pay for with money or time. Not only do you never get an "attagirl!" but the people you are trying most to help are fighting against you much of the time, bless their little hearts.

No wonder I glow when this happens.


That's my artwork, my words, right there looking lovely in Quilting Arts Magazine. One reader actually wrote to tell me that her ENTIRE university class showed up the morning after it arrived in Canada with the article in hand. Amazing how far a "thank you" can carry you. I've been dancing all day!

Hmmm. I'll have to remember to thank my lovely husband and children for the good things they do. They probably don't hear "thank you" often enough either.

In other great news, Play With Paint will open for registration this Saturday at Quilt University. The start date is March 15th. I'm really looking forward to seeing seeing what people come up with when they lose some of their inhibitions and just PLAY! I absolutely love teaching. And this is a great opportunity. I get to stay home with the munchkins and play with my grown-up friends too. Hope to see some of you there!