Showing posts with label melanie testa. Show all posts

Thursday, March 8, 2012

Work In Progress: Rockstar Boro Skirt

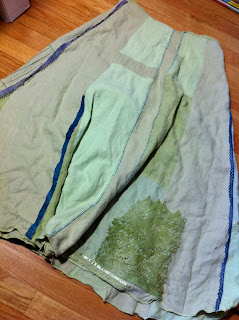
More progress on the boro inspired skirt.
 
I've sewn down dyed vintage laces to cover the raw seams but haven't embroidered them yet.
At my current pace this project is going to be ongoing for years..... and years.
skirt front view - Lyric Kinard
 If you missed it - Melanie Testa inspired this project with a more true to form Boro project of her own.
If you haven't seen her new website yet - go check it out. It's GORGEOUS!
skirt back view - Lyric Kinard
 This will eventually be partially covered by more embroidery. I'm thinking this whole skirt will be a continual embroidered travel journal... which means the Disney Castle should show up next.

Here is a link to the previous progress posts for this project.
(I love alliteration - don't you?)

Monday, January 30, 2012

guest tutorial: Melanie Testa makes ...

My good friend and fellow artist Melanie Testa is currently a vagabond blogger. Sad for her - lucky for us. We wish her blog a very speedy recovery. In the meantime today I have the great good pleasure of hosting her fabulous

Artspark heARTfest tutorial


 Here she goes.....
If you haven’t noticed, I am having blog troubles, yup! it is totally broken! But that doesn’t mean I don’t have fabulous friends that don’t want to help  blogless girl out! And don’t worry, I will have a new blog and web site soon. So let’s all thank Lyric for helping me bring a Tute Toot Tutorial to you for our Heartfelt Blog Hop.


When I was a girl, I loved going to the pharmacy around Valentine’s Day to purchase a plastic wrapped box of Valentines. They would come with little envelopes and need to be torn down to size along perforated edges. This was so very exciting to do, and going home to make an envelope out to each person in my class was excitement beyond measure! So I present a tutorial using stamps, sweet imagery and perforated edges.
You will need:
Paper to print on
Sticky back fun foam
Pencil
Exacto knife
Tracing paper
Stamp pads
plastic ruler

Fun foam is the way to go, create a stamp (or 4) that fits your valentine design. My valentine’s are 2x3”, so my stamps fit within this size. I drew my design on tissue and rubbed it onto the foam.
Cut your design. 
Peel the backing off the fun foam and adhere to acetate or a backing of your choice. I put my tracing paper wrong side up underneath my acetate.
Pencil in a grid to size and begin printing your stamps, using stamp pads, within the grid.
Using the Pattern Wheel and plastic ruler, perforate your design along the penciled grid.
Fold and tear your valentine’s apart.
Write a special message on the back of your design and start giving your special Valentine’s to your best friends, buddies and and of course, your most cherished loved one(s)! 
Enjoy!
-Melly

Saturday, December 17, 2011

Work in Progress: Rockstar Boro

Beautiful Boro and education at KimonoBoy.com
Japanese Boro is a form of patchwork repair, a method for using every scrap of precious cloth and keeping your clothing functional over many, many, years. It was a necessity - not an artistic choice.

I think my Boro project is much more in the spirit of Boro, rather than following the actual design esthetics. I think it's a beautiful idea. Even though I do my best not to subscribe to our culture's rampant consumerism, I find myself being wasteful more often than not. I'm seriously considering a clothing moratorium for an entire year. I certainly have more than enough clothes. I also have many, many projects I've wanted to make - and the fabric to make them.


So. I have quite a collection of old linens and lace scraps - other people's cast-offs. Some of them are exquisite hand made pieces that I can only imagine creating. 

Many of them are deteriorating, no longer useful in their original form. I've dyed them and now a few choice pieces will add color and shape to my wearable "canvas." 

It's no different than making a sketch or any other work of art. It's all about composition. I have to choose shapes and colors and think about placement.

If I use a contrasting color it might become a focal point. It's very important in wearable art to consider the placement of a focal point or any attention grabbing element. There are places you don't want people to stare when they are looking at your body right?
Boro beginnings by Lyric Kinard
And to reference Melanie Testa, the inspiration for this project, I've stitched a little bird inspired by some of her artwork. Literally - sketching with needle and thread.

Friday, December 16, 2011

Work in Progress: Rockstar Boro (how to sew a decorative hanging pocket)

Progress on the Boro
Inspired by Melanie Testa's Rockstar Boro project.
I got the zipper put in (the right way this time!), and the hem finished with a triple row of zig-zag to give it a little bit of a lettuce edge.

I put it on and decided the pocket that used to be a shirt pocket is too small to keep my phone from slipping out when I sit or walk. Time for a free hanging deep pocket. Decorative I think. Deep enough to hold my phone and keys. Free hanging so it won't make the rest of the skirt bulge or get in the way of the swing. I really love clothing to swing and move when I do.

I sewed a triangular patch where I want the opening to be - you'll see it in a minute. You can skip this step entirely if you want to make your own hanging pocket - or make a decorative patch in any shape your creative mind comes up with.
Next I placed the first pocket rectangle over it and sewed the opening shape. Again - this is a place to use your creativity. A rectangle is classic but how about a heart or an arrow? I made a smile.
Make sure to leave at least 1/2 inch of cloth (I didn't) on either side of the opening. Also make sure the opening is at least as wide as your hand.

Slit and cut the inside of your opening - carefully go all the way to the corners.
Clip the seam allowances.

Trim the seam allowances if the fabric is thick and then turn it inside out.
Iron it so that you see just a bit of the outside fabric when you are looking at it from the backside.
Top stitch the opening if you'd like. You could also do some fancy decorative stitching here.

Pin on your second pocket rectangle.

Carefully sew all the way around the edge of the pocket. I sew from the back side of the pocket, pulling the skirt out of the way to make sure I don't catch it. This is the tricky bit next to the opening that would have been easier if I had left more seam allowance.
(That's my edge stitching foot - I was too lazy to take it off for this step.)

I finished the pocket edges the lazy way, turned them over and zig-zagged them. 

There's the triangular patch on the front. I also sewed another line of stitching all the way across the top of that triangle, catching the top of the hanging pocket. That way and weight in the pocket will pull on the full skirt rather than just the pocket opening - which would make it sag out anyway.
More to come tomorrow.

Tuesday, December 6, 2011

Joy in Service: Day 6 Thank a Worker

The invisible ones.
The guys who pick up your garbage. The custodian who cleans up the school. The bus driver. The kid who gathers the grocery carts. Your mail carrier.

What ideas do you have for ways to thank them. I'm thinking of standing out when our garbage truck driver comes through and handing him a gift. They drive by in the big robot trucks so the driver doesn't usually get out of the truck... I'd have to get his attention some how. We love the robot truck. We run to the window to watch the arms reach out and grab the bin and lift it up so high to dump it into the truck! I think I might still run to the window to watch even without kids.

Boro Project by Lyric Kinard
I've been mentioning this to so people as I'm out in different places and it's so much fun to see them think of little ideas they can do to make someone feel better. I did stop and say thank you to the secretary at my kidlet's school, and told her how great she looked. I didn't leave myself enough time to give a gift. I did some quick shopping later and instead of just picking up teacher gifts, I picked up extras for the bus driver, the secretary, and the custodians. They need the lift as much as the teachers do.

But I feel bad for one thing. I was rotten grouchy after some worse than usual "homework fights" with the kids last night and after they went to bed I went to the grocery store. I smiled and asked one girl who was stocking shelves how she was and she said "tired." I smiled and said "tired too." I wish, wish, wish, I had a little gift... a flower, anything, to give her. Or maybe I should have just knelt down next to her and given her a very quick hug and told her thank you for what she does. Now I know what to do next time.


And here is the progress on my Boro project. One more gore in the skirt, a zipper and a hems and then some of the real fun begins. I think I might raid my stash of hand dyed lace. I like the idea of embroidering stories into the cloth as Melly does.
Upcycling!
Please tell me what you did to make the world a better place today!
It's not bragging - it's giving me ideas for what I can do.
It's inspiring others to look outward.
There is nothing that makes one feel better than helping someone else.

And I'm having so much fun sending little thank-you gifts from my studio. Mostly some lovely Quilting Arts magazines that I need to clear out, but a few other things here and there.

Monday, December 5, 2011

Joy in Service - Day 5 upcycle something

Yesterday you did so many lovely things. Knitted prayer shawls and caps for soldiers, gave compliments, coffee cozies and desert choices to both strangers and loved ones. I offered a ride to a friend and fed a couple of hungry young missionaries who were far from home. I sat next to someone looking alone. 

Gene Black is making and collecting lap quilts for a youth center. Do you have one you can ship off?


Today I'm officially joining Melanie Testa in her Rockstar Boro project.
Look here to learn more about this beautiful japanese upcycling art form.
I've had this stack of old linen shirts - cut up and laying over the back of my studio chair for months. I'll start there and work out a skirt. I know it's not exactly following the Boro esthetic of appliquéing onto existing garments.... but I'll get there.

First this had to come off Brunhilda, my duct-tpe-double. I've enjoyed remembering my fabulous sisters every time I glanced over to it's colorful corner. (really, you've got to go check us out...you'll smile!)

This is the progress so far in the first quick hour.

After I get back from lunch and center time at kidlet5's school I'll sew a few more bits together. I think I'll take something (who knows what) as a little surprise giftie for the front office secretary.

Tell me what you did today!

Sunday, November 13, 2011

Artspark Winter Tutorial Day 5

You're going to love Traci Bunker's video tutorial!


Melanie Testa has had some technical difficulties and her tutorial will be up some time tomorrow.


Friday, August 19, 2011

ARTSPARK Giveaway Day 10!


Today it's Melanie Testa's turn
You can click HERE to read an interview I did with Melanie way back when.
Or HERE to read a review of her book.
You could win both if you leave a comment on Melanie's blog!
Last chance!
Hurry to each of these blogs and leave a comment on the giveaway post in order to win!
Wed August 10 Carla Sonhiem http://carlasonheim.wordpress.com/
Thurs August 11 Diana Trout http://dianatrout.typepad.com/blog/
Fri August 12 Gloria Hansen http://www.gloriahansen.com/weblog/
Sat August 13 Tracie Lyn Huskamp http://thereddoor-studio.blogspot.com/
Sun August 14 Jane LaFazio http://JaneVille.blogspot.com
Mon August 15 Jill Berry http://jillberrydesign.com/blog/
Tues August 16 Judy Coates Perez http://judyperez.blogspot.com
Wed August 17 Kelli Nina Perkins http://ephemeralalchemy.blogspot.com/
Thurs August 18 Lyric Kinard http://lyrickinard.blogspot.com/
Fri August 19 Melanie Testa http://www.melanietesta.com/mtype/

Tuesday, December 28, 2010

The Sketchbook Challenge: prepping a book

I'm excited about the Sketchbook Challenge. I've always used my sketchbooks as a learning tool and a reference library. If it doesn't go down onto a page of my ubiquitous little black sketchbook - the idea most often disappears somewhere out in the ether. These little black books will never go away.

But this is a challenge right? I don't expect to create a masterpiece - but I've been in love with Melanie Testa's visual journals since the first time I saw them that I'm inspired to take a step in that direction this year. I'm going to play. I'm going to experiment. I'm going to strive for beauty. Take a look at the first step I'm taking.


So.
Join me. Join us!
Go over to the Sketchbook Challenge blog and "follow" it.
Sign in to the Flickr group.
You could win FAAAABULOUS PRIZES!
(If you've seen the muppet named Rizzo the Rat say that - say it in his voice!)
You won't believe all the exciting goodies that our sponsors are offering for the giveaways.

Friday, October 15, 2010

Art Spark Tutorial Tsunami (part 1)

Same fabulous tutorials have been posted by members of ArtSpark!

Jane LaFazio
Layered Journal Page


Melanie Testa
Fun Foam Stamps

Part 2 comes tomorrow so check back soon!a

Tuesday, July 27, 2010

New York New York... it's a wonderful town!


I've been wanting to visit New York City for a while now. I've had the opportunity but never felt like dragging the kids along for the ride. It seemed like more of an adventure for grown ups. The past few days after paying my dues (I watched my brother's kids in Philly then he watched mine) I got the chance to take a quick overnight trip into the city.

The lovely and talented Melanie Testa and I spent two days walking and playing and having, in general, a fantastic New York experience! Here she is getting ready to unwrap a tasty lunch packet we got at the Japanese store. Oh, my - a whole floor of books. A floor of stuff including office and art supplies and a cafe on the top floor. Check out this lovely pen that Melanie had me try out - refillable ink cartridges and an actual brush tip - bristles and everything. Naturally I had to come home with one. The lunch packets were rice with spicy cod roe, wrapped in seaweed. Of course it took an engineer to open the thing. There was plastic between the rice and the seaweed as well as the on the outside and if you opened it just right then it all lands together in a lovely packet. (No - neither one of us got it quite right but they were delicious anyway!

Our first stop was Central Park and the Zoo. It's the tiniest zoo I've ever seen but it was lovely. We truly enjoyed the tropical house with lemurs and birds and a few reptiles here and there. 

Check out these legs. Coming from a woman who loves, loves, loves crazy socks, this was my favorite shot of the morning.

We traipsed up through the park to the Met, but had forgotten that it was closed on Mondays so we simply walked west a while then hopped onto the subway and would our way to Melanie's lovely (tiny) apartment and studio. I must say she has made the best  of her situation. She's very organized and everything had a space. I'll not complain about my studio any more. Hers is the size of my closet. Literally.


Day two and we went to Spring Studio in SOHO. It's just a basement room but they have life drawing sessions two to three times every day!!! We spent a full three hours drawing two, five, ten, and twenty minute poses. (I think this is a five minute pose.)


What a fun opportunity - not having had the opportunity to take life drawing courses in college. It was three hours of drawing - sometimes fun, sometimes frustrating - but a wonderful chance to learn.

Next it was more subways, more walking, more quick stops into churches, shops, (even a quilt shop), and elegant train stations with beautiful constellations on the ceiling.


We ate our lunch outside of Melanie's Alma Matter, the Fashion Institute of Technology, the popped in to their gallery to view their current exhibit, Eco-Fashion: Going Green. I found it quite interesting to see how they fit some of their historical collections into the theme, as well as spotlighting some very forward thinking current designers.


One of the big impressions I'll take from the city is the interaction of so many people sharing the same space. Standing together on the subway. Making way on the sidewalk. Enjoying a pleasant sunny day.


People going places and doing things. So many all together in one place. And guess what. They weren't rude or all dressed in black. Just as many people smiled and were helpful as in any other place I've been. Guess what? I love New York! Two thumbs up. 


Just remember to bring very comfortable walking shoes, be prepared for adventure, and just soak in the humanity, the art, the environment and all the wonderfulness in its colorful and myriad forms when you visit. NYC will definitely be seeing me again.

Monday, June 21, 2010

Tutorial Links

Here's a quick recap of Art Spark's Tutorial Tsunami. To make things easier for you as well, I've added a new page link to the top of this blog where you can find links to all the tutorials that will be posted here.
Alisa Burke’s Altered Striped Tank

Judy Coates Perez' Printed Tea Bags


Gloria Hansen's Painted Shibori


Tracie Lyn Huskamp – Nature Inspired Greeting Card


Lyric Kinard’s Painted Shoes


Jane LaFazio’s machine felting tutorial


Kelli Nina Perkins – Spoon Poetry

Diana Trout’s Sumi Smoosh

Alma Stoller's Recycled Magazine Pages


Melanie Testa’s Cloth to Headband