
Welcome to the Shoe Tute
Part of Art Spark's Tutorial Tsunami!

Question?
What can a person do with some acrylic paints, brushes, some nifty new paint markers, and a favorite pair of old but comfy shoes?
What can a person do with some acrylic paints, brushes, some nifty new paint markers, and a favorite pair of old but comfy shoes?
Answer!

Get some STYLE my friend!

Ready? Find a pair of shoes, preferably leather. My favorite comfy shoes were my first try - they couldn't look any worse so there was nothing to lose eh? My next pair were a great pair of NAOT's (one of the very few brands that fit me.) I think these were as cheap as they were on Ebay because they were kind of an ugly color. Maybe you'll have the same luck as I did there.

You'll need: shoes, fingernail polish remover, gesso, acrylic paint, spray sealer. Optional - sharpie, paint markers.
Take the shoes and clean them up as much as you can then rub a little nail polish remover all over them . It roughs them up and removes any finishes so the paint will stick to the leather.
 Prime the shoes with a layer of gesso then let them dry.
Chose one or several base paint colors and block them in. That just means put the colors where you want them. I used textile paint because those happened to be the paints I have on hand. I did choose opaque paints rather than transparent in order to get better coverage.

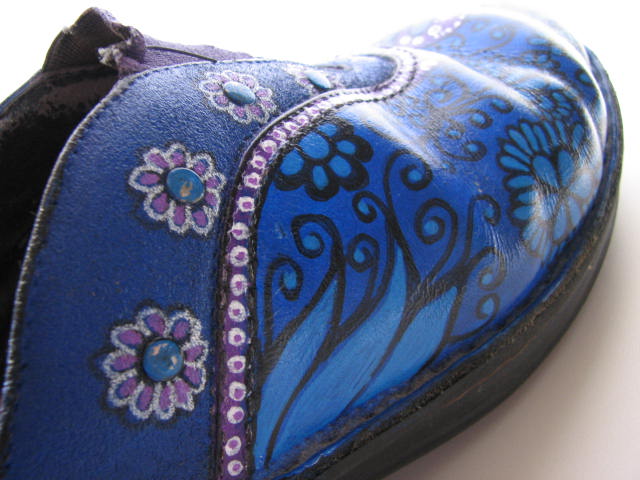
 I like using the paint markers next to doodle in some shapes. You could also choose to start out with the sharpie and doodle designs onto your color blocks. On the blue shoes I painted blue first, purple next, used the sharpies, then filled in spots with the paint markers. For the red shoes, I knew I wanted them to be RED, RED, RED so I kept it monochromatic. I was so excited about the paint markers that I played with those first then filled in around them with the sharpies.
 Loved what was happening here so I kept going and doodled more with the sharpie. Uh... didn't like it much. Hey - not a problem! Now I know what I want. Paint back over it and decide that for this particular shoe, less is enough!
Take the shoe outside, stuff the inside with newspaper, tape off the soles if you'd like to then spray a thin coat of sealer to protect the paint.Wait patiently for the stuff to dry then wear with STYLE!


If you missed the first wave of tutorials you can check out Melanie, Diana, and Jane for their fabulous tutorials!
30 comments:
I totally love these and think they will be a great project to do with my daughter. Excellent tutorial. Thank you for sharing it.
I have wanted painted shoes forever and now I will have them! Thanks a million for taking the time to put this tutorial together!
Oh, I love the shoes!!! Great idea!
I LOVE, LOVE, LOVE these shoes!!! Thanks for the tutorial - I'll be on the lookout for shoes to play with!
It's totally addictive - none of your shoes are safe once you start painting them!
I LOVE these, Lyric. Great idea and I have a pair of shoes that are just aching for a make-over. Fun, fun, fun! Thanks
I love these!!! Can't wait to try it out. I've got a pair of shoes that desperately need updating!
THANKS!
Love them Lyric.
Heading to my closet and then will gather up the supplies which I have somewhere in this house!
waay stylish, girlfriend!! thanks.
Brilliant! I've been checking out Zazzle for custom printed shoes with my artwork and had just come to the conclusion that I should paint my own. Here you are with all the how-to info. How perfect! Thanks!
YOWZA! Those shoes are amazing! But I want THOSE shoes -- such a cute style. THANK YOU for sharing this. Uh-oh, my shoes will never measure up again.
You are right - they WERE hideous, but now... watch out world, altered shoes are now the new rage!
These are fantastic, Lyric!! Wow!!
Awesome! What a great way to recycle some comfy shoes!
Thank you so much for sharing your time and talent. They look like such fun!
"spray a thin coat of sealer to protect the paint"
hi Lyric, What do you use for sealer? And what if you live in a place where it rains alot...does one sealer work better than others?
Thanks,
sandy in the UK
Sandy - use whatever acrylic sealer in a spray can you have. Perhaps if you are worried about rain use several very light coats.
This looks like so much fun! Now I just have to find an older pair of shoes (I just cleaned out my closet!). Have a Blessed week.
How much fun!
The plainer red is better, proving the old adage, "less is more."
Lyric,
Love the shoes. Weren't you working on the blue pair at Fabrications last year? I need to go thru the closet now...Have a great summer and thanks for the tute.
Lera Cavanaugh
Oh my goodness! what a great idea! I love those shoes!
Great shoes! I need to find some to paint!
Fun!!
OMg... I have to do this....your shoes looks so darn cool! I'm going searching to find a pair and then going to town with this tutorial. Thanks Lyric!
Hi Lera!!! It's great to see you again. Fabrications was one of the best ever teaching experiences!
And yes - I brought these to work on - it's taken me more than a year to get around to actually getting them done. But now I'm on a roll and am working on pair number three. IN fact - just got another terribly ugly pair of NAOTS for very cheap on ebay so that I can paint them. Most NAOTs are very cute - these are not. but they soon WILL be!
Hope you are well!
Both pairs turned out so great. I've been dreaming about painting a pair of shoes for years but never had the right pair, or dared doing it... Thanks for a great tut!
Hey, Lyric,
Thanks for the great tutorial. My local fiber arts group is getting together to do this next week, and I have a question. What purpose does the gesso serve? If I want my background to be black, and my shoes already are black, can't I just do the nail polish thing, and then start painting my design? Or will my bright colors not work against the black without the white gesso behind them?
Hi Susan - I think the gesso is simply a layer that helps the paint to stick better and is probably necessary when using bright or light colors.
I think you could get away with a thin layer of black paint instead - or try none at all. ON my really old shoes that get that crease across the toe - sometimes (especially if I forget to seal it) the paint will flake a bit and a white gesso shows through.
It never hurts to experiment and see what works for you!
eXCELENT,Thanks very much for your toturial,
Oh WOW! Thanks so much for this wonderful tutorial. I've been wanting painted shoes for some time but hadn't a clue about how to make my own. Now I can be fearless about giving it a try. Thank you!
Post a Comment