Showing posts with label thermofax. Show all posts

Saturday, May 5, 2012

Tutorial: How to edit a photo for a thermofax screen

I'd like to show you how to take a photograph and prepare it for a thermofax screen. Printing with these screens is one of my very favorite things to do - you can use them with cloth or paper or really - any flat surface. If you don't have access to a thermofax machine, I have a service where I can create a screen for you from your own images, as well as having a number of ready-made images for you to use.


1- Select an image. Choose something with high contrast - it's easiest if it has a plain or simple background. Either use your own photography or find something that is copyright free. Wikimedia Commons has a wonderful repository of images under Creative Commons Licenses that are available for you to use. Download the highest resolution available.
Harmann zebra, Hobatere Private Reserve, west of Etosha National Park
Author - moongatclimber
2 - Open your image in your favorite digital editing program. 
I'm using Adobe's Photoshop Elements (PS10) but the tools I'm using are fairly standard. They might be in a different place - if you have trouble finding them type in the name of the tool in the help window on the toolbar. You can download a trial version of the PS10 and use if free of charge for 30 days.

3- Crop your image.
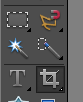
Use the CROP tool to eliminate extra background. It simply gives you less space to have to fuss with.


4- Remember that command or control Z is your best friend - it's the "undo" function and will let you back up as many steps as you need to if you don't like what you've done.


\5- Select your subject. Use the magic wand, or some other selection tool to click and select all the way around the edge of your subject. You might need to click a lot in some areas that don't have a high contrast line - don't worry if extra space is included - you can erase that in a minute.


Sometimes when I double click I lose the selection. I just clicked too fast and the whole thing disappeared. What I do is just hit command Z again and it reappears.

6- Invert the selection.  The blinky line will now be around the outside of the image and around your subject.


7- Hit Delete and the background will disappear - at least mostly.

8- Control - D deselects everything.

9- Click on the Zoom tool and zoom in so you can see the edges of your work.


You can see that there are areas that need a bit of cleaning up and areas that you might not want to draw attention to. (Sorry guy - you’re going to be gelded.)


10- Choose the eraser tool to clean up your edges. 
Use the slider to change the size of the pixel brush so that it comfortably fits within your picture. Keep the opacity at 100%.


Start working your edges but try not to erase large areas all in one sweep. That way if you accidentally erase something you wanted to keep (remember “control Z!”) you won’t have to re-do large areas.
Continue to zoom in and out, moving around your image and changing the size of your brush to get into any tight areas.


11- Play with the Threshold filter found under the Filter/Adjustments menu. Sometimes it works the first time but sometimes you need to back out and fix some other things first. This is one of those times.
In this case, Mr. Stripes has lost the stripes on his back - he’s not quite ready for the “Threshold” filter yet. Simply hit “cancel” and we’ll do something else.


12- Play with the lighting. Find "Enhance/Lighting" then either "Brightness/Contrast" or  "Shadows/Highlights". In this case - it is the highlights on the Zebra’s back that are being lost so I’m going to play with those for a bit and see if I can get the black and white stripes to look more even.

I’ve darkened the highlights, played with the shadows and messed with the midtone contrast until it looks like all of the stripes are closer to the same. Notice all the highly technical terms I’ve used - it’s really just messing around with things until you get something you think will work. As you gain experience you’ll be able to come quicker to the place where you can make the image work for a thermofax screen.

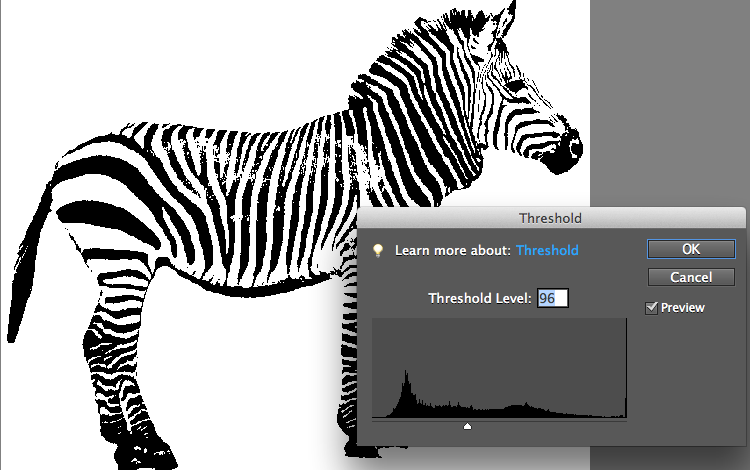
13- Try the Theshold function again.  My goal was to keep his eye from disappearing but to still keep the stripes on his back. Just move the slider back and forth until you are happy with your image.


14- Save your image. In fact - it is helpful to take this step quite often during your explorations. Hit File/Save As - (NOT just the automatic save function!) and rename each picture as you go. For instance, Zebra1.jpg, Zebra1.jpg etc.
Another thing to pay attention to when that "save as" screen is up is the "options" button. (I think I might have cut it off in this picture. It's usually on the bottom right. Slide your "Image Quality" button all the way to maximum. This minimizes the compression that happens every time you save a jpg. If you don't do this the file size might be so small by the time I get it that it will be too pixelated to use.

And there you have it. A crisp black and white image - no shades of gray - ready to be turned into a thermofax screen for your printing pleasure.


Send it through your thermofax machine or send it off to your favorite thermofax service provider and get ready to play! You'll be printing in no time at all!


Thursday, April 19, 2012

SurfaceXplorations! A new emagazine from Interweave Press

I'm very happy to introduce you to a new e-magazine by the talented crew over at
Interweave Press
Surface Explorations is an all digital publication and can be downloaded to your desktop or to your iPad or other tablet. Even though I can do everything on my desktop that this publication is meant to do - I'm thinking an iPad might be in my near future. It's that COOL!!!

I don't think printed media is going away any time soon - there is nothing like holding a good book in your hand and turning a page and electronics and the beach don't mix. BUT - you can't click a link to go straight to a source or watch a video of the author actually showing you how to do what you just read about in a paper magazine. With this publication you can do that and more.


I'm very honored to be included in the inaugural issue of SurfaceXplorations with an article and video on Thermofax Screen Printing. I'll show you a little bit about discharge (and remind you why testing is important!) and just plain have some fun with paint.

Some of the other authors are giving you a little peak into their contributions to this fun new digital publication. Stop by each of their blogs to check it out.

Mon 4/16 Lindsey Murray http://quiltingdaily.com
Wed 4/18 Jackie Lams http://studiolams.com
Thu 4/19 Lyric Kinard http://lyrickinard.blogspot.com
Fri 4/20 April Sproule http://sproulestudios.blogspot.com
Tues 4/24 Jane Davila http://janedavila.blogspot.com


If you are interested in learning even more about screen printing, I have an on-line class called Freeform Screen Printing opening up on May 4th over at QuiltUniversity.com! We'll go even deeper into thermofax screens and learn a lot about regular screen printing too.

Scroll down a bit for another post about it or check out the class description here.

Monday, April 2, 2012

Tutorial: Screen Printed Cat Pillow

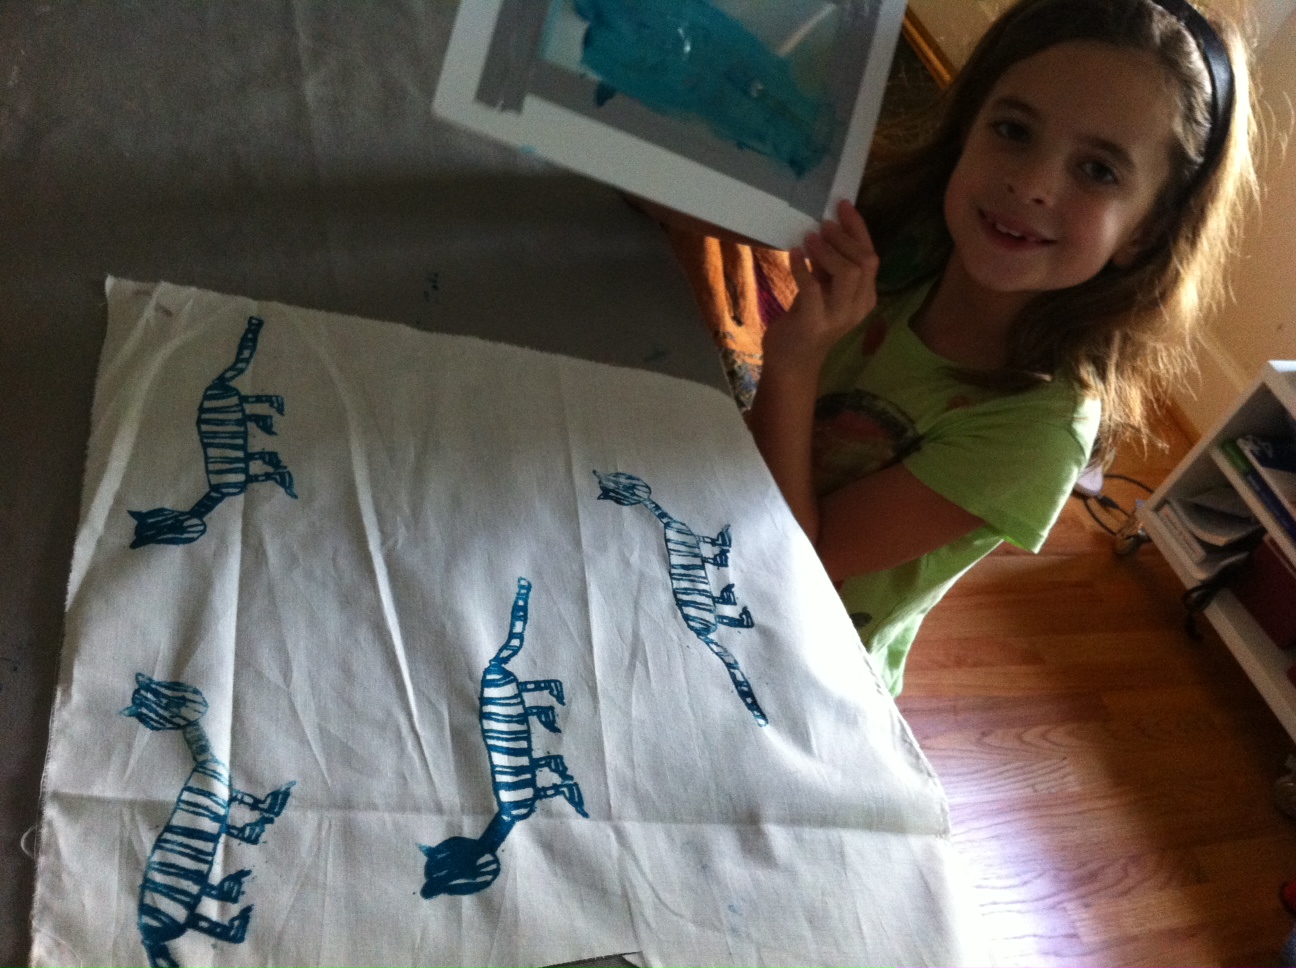
A couple of weeks ago one of my little ones walked in and said, "will you teach me to make a screen?" Now a very good mother would have done this long ago, especially since this little one has been asking to do this for months. Unfortunately I'm more of the "my studio is MY refuge" kind of mother and I don't take time out as often as I should to let them into my space. I felt the need to take time for her this time. So glad I did.

She would like to share with you her process.
She things that if she can do it so can you!
Draw your picture with a carbon pencil and send it through a thermofax machine and thermal-mesh to make a screen. You can also email your image to a thermofax screen service and let someone else make the screen for you. 

Lay out your cloth on a padded print surface (mine is a layer of felt under twill) and position your screen. It's easier to handle a foam brush than a squeegee. Dip it in the paint. With one hand hold the frame, with the other press the brush across the screen. Notice how her finger is pressing the brush? You really need to squish the paint fairly hard to get the paint through to the fabric.

We made a few prints then washed and dried the screen before turning it over and making some facing the other way. We also decided to do some splatter painting over the top of the kitties just for fun. Dip an old toothbrush into the paint and run your finger over it. It makes a really fun mess!

Cut out the kitties and hold them up to the light and make sure they are aligned. Pin the cats and sew a straight stitch around them, leaving a gap about two inches wide. Use pinking shears to trim about 1/4 inch around the outside of the seam.

Stuff your pillow through the gap. I always have left over bits of batting so she tore some of those up and used them.

Squish the batting back into the pillow and stick a pin into it so that it's easier to sew.

Sew a straight stitch to close the gap.

Pose for a picture with your beautiful little creations. Carry them around and tell everyone you know that you made them yourself. Sleep with them every night.

We'll be playing with thermofax screen printing here in the studio on April 18th.
I'd love to have you join me! 
More information can be found here.

Monday, March 26, 2012

New Work: Links (part 1)


A couple of weeks ago I did my usual thing of looking at the calendar to see what was coming up the next week and realized there was a deadline I had forgotten about. A LOOMING deadline. 

Good grief - why is it that I can't get myself to work on these things ahead of time? Of course I begin to mull things over in my head as soon as I know the requirements for the show so it wasn't a huge scramble to come up with a new idea. It would have been kinder to my self to have begun at least a week earlier though so that I could have more time to test variations on my ideas.

The theme of this show was "Rituals." It is a juried invitational - which means the curators invite a number of people to participate - but the final artworks still have to go through a jury process and have a chance of being rejected. I think it's a good thing. The organizers start with a set of known artists whose work they admire but the artists are still encouraged to do their best work, knowing it isn't a sure bet.

I started with a portrait taken by the talented photographer, Julia Wade. It's been a favorite of mine for a long time and she gave me permission to create artwork from her photography. Remember - just because you've paid for a piece or art or photography does not mean you own the copyright - that remains with the artist.

In thinking about the theme of "Rituals" has had me noticing their importance in my life. I have rituals that range from a tiny repeated gesture that brings me simple comfort to the most deeply important spiritual practices that are central to who I am. The common factor among all of them is that they link me to the world around me, to my family and friends, and to the generations before and ahead of me. 

I played for a day with photoshop and different iterations of the portrait until I came up with something I liked then spent another day fussing with my wonderful (but persnickety) wide format Epson printer.

Next I created a thermofax screen with swirly circles on it and printed some white on white cloth. I think circles are a major theme in much of my work. When I'm thinking about them deeply, as I was in this piece, they represent something whole, something never-ending, things that are connected. Most of the time - they are just my favorite shape to play with.

Check in tomorrow for the rest of the story.

Saturday, March 24, 2012

Studio Class: Thermofax Screen Printing April 18


New Studio Class
Thermofax Screen Printing
Wednesday April 18th 
11am - 2pm

$65.00 includes lunch and ALL supplies, fabric, paint, and a large framed screen to take home.
Enjoy a few hours of creative playtime with Lyric as you learn the basics of what makes a good image for a thermofax screen. You'll learn how to choose, how to edit, and how to send an image to a service provider or use your own machine.


After creating your own unique image, make a screen using Lyric's thermofax machine and learn how to prepare it for printing by taping the frame to a screen or binding it with duct tape.

Learn how to use the screens with a squeegee or as a stencil, what kind of paints to use, what kinds of fabrics, how to discharge and layer imagery.

Are you ready to PLAY!?!
Sign up now - space will be limited to 8 students.
$65.00


Fee includes ALL materials, you don't need to bring a thing!
Wear old clothes or an apron.
Wednesday April 18th 
11am - 2pm

Wednesday, February 8, 2012

Doodles, Screens, and Art

I'm still doodling away even after last months Sketchbook Challenge theme has come and gone. As with many of us, it's simply a way of life. I thought I'd show you what I do with some of my doodles. I always have my little sketchbook with me and often will just play around with a shape or an idea or an image.

In this case I was playing with circles. Big circles, little circles, circles in a grid, circles in random places.

From a large series of circle scribbles I chose three that relate to each other in some way but have different scales and different visual textures. One scribbled and bold, one orderly, and one delicate.
Next I cut them out of my sketchbook, scan them and print them out in different sizes, then create a thermofax screen with each one. Now the fun really starts!


I gather up fabric that catches my fancy and use the screens to print or discharge those doodles onto the cloth. The cloth above was discharged with Cascade Dishwashing Gel. (You can find a tutorial here.)

Circles by Lyric Montgomery Kinard
Eventually this particular batch of fabric is put together into a lovely little abstract piece of art.

What ways can you think of to make use of your doodling?