Monday, July 4, 2011

Sketch-a-Day 4

Tape Dispenser sketch by Lyric Kinard
A completely ridiculous (and lovable) part of my frog collection.
I think I'm going to have to do a new post on my collection as it's grown a bit.
Just figured out how to post photos from my iphone to blogger thanks to this tutorial.

Sunday, July 3, 2011

The Sketchbook Challenge - July's Theme

Fun Stuff over at the Sketchbook Challenge this month!
sketch by Lyric Kinard
It's my turn to choose the theme and I think it's a good one. Of course there haven't been any bad ones.
You can read more about it here - but the short version is that I'm going to focus on the word
ELEMENT
So many possiblities.
Of course if you've read my book, or know me and my relentless soapbox (YOU can learn to be an artist!) you know one of the things I'll be thinking about are the elements of art.


I thought I'd do something fun and post a sketch a day this month. I'm going to take five minutes each day and look at the world around me. Find interest, find beauty. Think about it and absorb it as my pencil follows the path of my eye. One little visual thought each day. 

You don't have to find anything grand. A waste bin can have beautiful lines. 

LINE is one of the basic ELEMENTS of the visual language.
What is a line?

Friday, July 1, 2011

Faces on Friday


 Surprise! I actually got these posted on time.
And thought I'd share some of the sketches from a Life Drawing session
I attended two weeks ago as well.
 30 second poses


 1 minute pose
Gesture drawings
five minute drawings
15 minute drawing
15 minute drawing
30 minute drawing

Monday, June 27, 2011

Tutorial: Creating Depth and Space pt3 Color and Value


The Beautiful Smoky Mountains

I've been talking to you a little bit about how to create the illusion of depth and space in a work of art. It's a very useful tool to have in your belt when thinking about literal pathways. You can find my tutorial about using size and overlap here, and perspective here. Another simple device to use when creating the illusion of depth is to change color and value.

sketch by Lyric Kinard
Value is how much dark or light is in any given color. If you look carefully at the landscape around you you will see a difference in color and value as objects get farther away. Things closer to you will have sharper contrasts in value and brighter colors. Objects that are farther away become more blue and gray in color and the value contrasts lessen. 

Night Life by Jane Sassaman
Colors can also be used to create depth and space. Warm colors such as red and orange appear to come forward while cool colors seem to move away. Objects seen far away will appear grayer and bluer, as in the smoky purple of distant mountains. Volume and depth can also be created with the shading of one color from dark to light. The change in value alone turns a flat circle into a sphere.


Notice also that complementary (colors across from each other on the color wheel) appear to vibrate - to POP! Again, the warmer colors come forward and cool colors recede. The orange circle above seems to float a bit on the surface of the blue. If you add dark and light highlights you create the illusion of volume and depth as well.

Hope you've enjoyed these quick and easy tips. I'd love to hear any other tips you have.

Sunday, June 26, 2011

Sisters

The Mad Hatter
Crazy things can happen when my sisters and I get together.
The Duchess


Dark Alice

The Dodo Bird???


It has been a crazy week.

Monday, June 20, 2011

Tutorial: Creating Depth and Space pt2 Perspective


Photo by Lyric Kinard

Last week I talked a little bit about using the placement and sizes of shapes to create the illusion depth and space on a flat surface. Next week I'll talk about value and detail.

Church of Le Sacré-Coeur by Maruice Utrillo


PERSPECTIVE is another device that is used to create the illusion of depth and space in a two dimensional plane. Parallel lines in the artwork will appear to converge at a vanishing point. The basic technique involves choosing a point, usually at the horizon line, sometimes within the frame of the work, sometimes outside of it... and drawing your lines  to meet at that point.


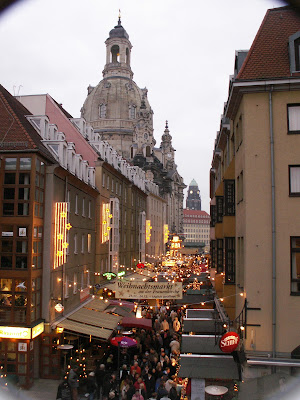
Dresden
Photo by Lyric Kinard


The lines of perspective are most easily seen in architectural landscapes.  Take a piece of tracing paper or even just your finger and trace the lines of the walkways, the streets, the buildings. They will all converge at a vanishing point.

This perspective study by Leonardo DaVinci shows how complex and technical perspective drawing can be. I spent quite a bit of time back in school learning to draft architectural perspectives.

Leonardo DaVinci

Remember too, that it can also be VERY simple! Simply draw a horizon line, choose a vanishing point, create some lines going towards that point and add your shapes within it. I'd love to see your perspective sketches in the flickr group!


I highly recommend looking up “perspective” in your library's subject database and studying a few books on the techniques used to create it. They range from simple to complex and the technique will be a valuable tool to have at your disposal.