Showing posts with label artspark. Show all posts

Saturday, May 5, 2012

Tutorial: How to edit a photo for a thermofax screen

I'd like to show you how to take a photograph and prepare it for a thermofax screen. Printing with these screens is one of my very favorite things to do - you can use them with cloth or paper or really - any flat surface. If you don't have access to a thermofax machine, I have a service where I can create a screen for you from your own images, as well as having a number of ready-made images for you to use.


1- Select an image. Choose something with high contrast - it's easiest if it has a plain or simple background. Either use your own photography or find something that is copyright free. Wikimedia Commons has a wonderful repository of images under Creative Commons Licenses that are available for you to use. Download the highest resolution available.
Harmann zebra, Hobatere Private Reserve, west of Etosha National Park
Author - moongatclimber
2 - Open your image in your favorite digital editing program. 
I'm using Adobe's Photoshop Elements (PS10) but the tools I'm using are fairly standard. They might be in a different place - if you have trouble finding them type in the name of the tool in the help window on the toolbar. You can download a trial version of the PS10 and use if free of charge for 30 days.

3- Crop your image.
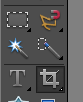
Use the CROP tool to eliminate extra background. It simply gives you less space to have to fuss with.


4- Remember that command or control Z is your best friend - it's the "undo" function and will let you back up as many steps as you need to if you don't like what you've done.


\5- Select your subject. Use the magic wand, or some other selection tool to click and select all the way around the edge of your subject. You might need to click a lot in some areas that don't have a high contrast line - don't worry if extra space is included - you can erase that in a minute.


Sometimes when I double click I lose the selection. I just clicked too fast and the whole thing disappeared. What I do is just hit command Z again and it reappears.

6- Invert the selection.  The blinky line will now be around the outside of the image and around your subject.


7- Hit Delete and the background will disappear - at least mostly.

8- Control - D deselects everything.

9- Click on the Zoom tool and zoom in so you can see the edges of your work.


You can see that there are areas that need a bit of cleaning up and areas that you might not want to draw attention to. (Sorry guy - you’re going to be gelded.)


10- Choose the eraser tool to clean up your edges. 
Use the slider to change the size of the pixel brush so that it comfortably fits within your picture. Keep the opacity at 100%.


Start working your edges but try not to erase large areas all in one sweep. That way if you accidentally erase something you wanted to keep (remember “control Z!”) you won’t have to re-do large areas.
Continue to zoom in and out, moving around your image and changing the size of your brush to get into any tight areas.


11- Play with the Threshold filter found under the Filter/Adjustments menu. Sometimes it works the first time but sometimes you need to back out and fix some other things first. This is one of those times.
In this case, Mr. Stripes has lost the stripes on his back - he’s not quite ready for the “Threshold” filter yet. Simply hit “cancel” and we’ll do something else.


12- Play with the lighting. Find "Enhance/Lighting" then either "Brightness/Contrast" or  "Shadows/Highlights". In this case - it is the highlights on the Zebra’s back that are being lost so I’m going to play with those for a bit and see if I can get the black and white stripes to look more even.

I’ve darkened the highlights, played with the shadows and messed with the midtone contrast until it looks like all of the stripes are closer to the same. Notice all the highly technical terms I’ve used - it’s really just messing around with things until you get something you think will work. As you gain experience you’ll be able to come quicker to the place where you can make the image work for a thermofax screen.

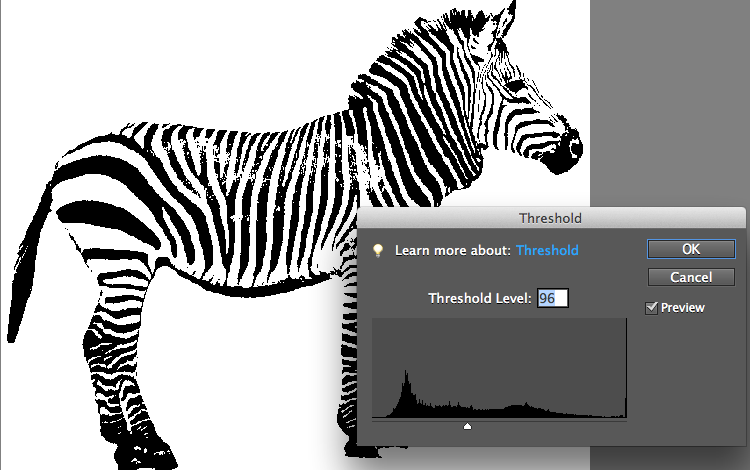
13- Try the Theshold function again.  My goal was to keep his eye from disappearing but to still keep the stripes on his back. Just move the slider back and forth until you are happy with your image.


14- Save your image. In fact - it is helpful to take this step quite often during your explorations. Hit File/Save As - (NOT just the automatic save function!) and rename each picture as you go. For instance, Zebra1.jpg, Zebra1.jpg etc.
Another thing to pay attention to when that "save as" screen is up is the "options" button. (I think I might have cut it off in this picture. It's usually on the bottom right. Slide your "Image Quality" button all the way to maximum. This minimizes the compression that happens every time you save a jpg. If you don't do this the file size might be so small by the time I get it that it will be too pixelated to use.

And there you have it. A crisp black and white image - no shades of gray - ready to be turned into a thermofax screen for your printing pleasure.


Send it through your thermofax machine or send it off to your favorite thermofax service provider and get ready to play! You'll be printing in no time at all!


Tuesday, May 1, 2012

Work In Progress: a really big canvas

A couple of weeks ago I had the extra leaf in my dining room table (it's a huge table - I love it!) and I had my padded print surface covering it - all ready to teach a thermofax screen printing class. Later in the day, before I put everything away I pulled out this gargantuan canvas and started playing with it.
It's been taking up room in my studio for months. I bought it on a whim - thinking it would be fun to just play with something so big. I love the freedom and the instant gratification I feel when I'm painting a canvas. As much as I love textiles - they can be time consuming. The plan for this canvas is to hang it on my bedroom wall - eventually.
Rain by Constance Pappalardo
I have a little painting I bought from Constance Pappalardo that I adore. Mine painting begins with the same geometry and colors but I think this first iteration is just a base layer. There is more to come. Eventually.

Don't forget to check out Artspark's next artist in the blog tour
Traci Bunker's
gelatin plate printing tutorial over at

Monday, April 30, 2012

Artspark's MAY DAY tutorial blog tour

Welcome to Artspark's 2012 May Day tutorial blog tour!
Each of the artists has put together a wonderful little sets of instructions for you to follow.
Spark your creativity!


April 30 - Tracie Lynn Huskamp

May 1 - Traci Bunkers
Gelatin Plate Printing on Fabric


May 2 - Lisa Engelbrecht


May 4 - Melanie Testa
A Thimble Purse Pattern

May 5 - Lyric Kinard

May 6 - Jill Berry
The Layers of my Heart

Monday, January 30, 2012

guest tutorial: Melanie Testa makes ...

My good friend and fellow artist Melanie Testa is currently a vagabond blogger. Sad for her - lucky for us. We wish her blog a very speedy recovery. In the meantime today I have the great good pleasure of hosting her fabulous

Artspark heARTfest tutorial


 Here she goes.....
If you haven’t noticed, I am having blog troubles, yup! it is totally broken! But that doesn’t mean I don’t have fabulous friends that don’t want to help  blogless girl out! And don’t worry, I will have a new blog and web site soon. So let’s all thank Lyric for helping me bring a Tute Toot Tutorial to you for our Heartfelt Blog Hop.


When I was a girl, I loved going to the pharmacy around Valentine’s Day to purchase a plastic wrapped box of Valentines. They would come with little envelopes and need to be torn down to size along perforated edges. This was so very exciting to do, and going home to make an envelope out to each person in my class was excitement beyond measure! So I present a tutorial using stamps, sweet imagery and perforated edges.
You will need:
Paper to print on
Sticky back fun foam
Pencil
Exacto knife
Tracing paper
Stamp pads
plastic ruler

Fun foam is the way to go, create a stamp (or 4) that fits your valentine design. My valentine’s are 2x3”, so my stamps fit within this size. I drew my design on tissue and rubbed it onto the foam.
Cut your design. 
Peel the backing off the fun foam and adhere to acetate or a backing of your choice. I put my tracing paper wrong side up underneath my acetate.
Pencil in a grid to size and begin printing your stamps, using stamp pads, within the grid.
Using the Pattern Wheel and plastic ruler, perforate your design along the penciled grid.
Fold and tear your valentine’s apart.
Write a special message on the back of your design and start giving your special Valentine’s to your best friends, buddies and and of course, your most cherished loved one(s)! 
Enjoy!
-Melly

Friday, January 27, 2012

Tutorial: Lovin' my Thermofax Screens

It’s my turn!
Artspark’s heARTfest tutorial blog hop

Let's make a sweet little valentine postcard
Valentine by Lyric Kinard
I’d like to show you how my little love affair with my Thermofax screens can be put to good use. 

I've had these collage backgrounds ready to go for a while. They are old watercolor studies (and I do mean old - like from 20 years ago!) that I've collaged with some worn out sheet music. I stuck them on with gel medium and then painted over them with some watered down acrylic paint. Gesso would have worked just as well. I just wanted to knock back the colors and the strong printing just a bit.


 Next I took my favorite black pens and doodled random hearts on paper, scanned it and printed it out in three different sizes. I was thinking of creating an overall background texture with this doodle. Nothing too regular or controlled or overpowering.

I send each print of the doodle through my wonderful Thermofax machine along with that green mesh fabric. The heat rollers burn the carbon in the toner through the emulsion coating on the screen.

It's almost magic how that happens. It's a little addicting.

I usually tape my larger screens to a frame to make them easier to deal with. When I'm printing yardage I like to be able to lift the screen with one had while it still has big glops of paint on it and move it to the next paint location.

Smaller screens are simply "bound" with duct tape to keep them from curling. 

I mixed up some pink acrylic paint - ProChem's ProFab textile paint, since it was within easy reach. I pulled out some cloth to play with while I was at it and printed away. I ended up only using the medium and the large screens for the collage. I got a little lazy and let the screens smudge on some of the prints. No worries.


Next comes some focal point imagery. I doodled some more hearts and then got sidetracked for MUCH too long - playing with funky new fonts (dafont.com) and words. I don't always have a plan in mind before I begin a project. 


Time for some more thermofax screens. I cut out words and arranged them on a piece of paper in order to maximize my screen material. The stuff isn't cheap so I hate to waste it. I made sure to leave enough space around each word or doodle so that I could cut out and tape them.

By the way - if you find yourself needing these screens, I've added them to my thermofax shop.


This time I chose a medium contrasting color instead of a lighter color. Purple just happens to be one of my favorites so purple hearts it is! When a screen is taped instead of framed. I like to use a foam brush and just mush the paint through the screen like a stencil.

Lynn Krawczyk has some fantastic video tutorials for how to do this - and she sells some pretty awesome screens!

Last step? Choose which fun message you want to share with our valentine. These are cut into 5x7 cards. I can write on the back, stick on a stamp and drop them right in the mail. 

Super SWEET eh?
Valentine by Lyric Kinard
And yes, dear readers, I do.
Valentines, Lyric Kinard
I love you!

Life is too short not to just say it out loud.


If you are in love with any of these screens you can purchase them here.

Hope you've enjoyed this fun little project.
Keep your eye out for

(my mouth is watering already)


1/30/2012 Kelli Nina Perkins
Felted Heart Soaps
(Is it just me or are they too gorgeous to actually USE?)